This image is not<\/b> licensed under the Creative Commons license applied to text content and some other images posted to the wikiHow website. wikiHow, Inc. is the copyright holder of this image under U.S. and international copyright laws. wikiHow, Inc. is the copyright holder of this image under U.S. and international copyright laws. WebBean plants do not need as much fertilizer as other crops. Plant seeds directly in the garden once the soil has warmed. I feel bad because my kids are taking them home and I wanted them to be successful . I have jars without lids. Place the bean cups on a lab tray to catch any water that trickles down, and for better storage. Both seeds germinated and grew into small bean plants. When you try again, here are my tips to avoid mold: 1. Transferring the Plants to Soil 1. If you want to keep the plants alive or transfer them into a garden, you will need to begin germination closer to actual planting time. This image may not be used by other entities without the express written consent of wikiHow, Inc.
\n<\/p>
\n<\/p><\/div>"}, {"smallUrl":"https:\/\/www.wikihow.com\/images\/thumb\/6\/64\/Grow-a-Bean-Plant-Step-8-Version-2.jpg\/v4-460px-Grow-a-Bean-Plant-Step-8-Version-2.jpg","bigUrl":"\/images\/thumb\/6\/64\/Grow-a-Bean-Plant-Step-8-Version-2.jpg\/aid2206209-v4-728px-Grow-a-Bean-Plant-Step-8-Version-2.jpg","smallWidth":460,"smallHeight":345,"bigWidth":728,"bigHeight":546,"licensing":"
\u00a9 2023 wikiHow, Inc. All rights reserved. Plant the sprouts and cotton in soil when they're 8 in (20 cm) tall. Any opinions, findings, and conclusions or recommendations expressed in this material are those of the author(s) and do not necessarily reflect the views of the National Science Foundation. Cover the top of the cup with clear plastic wrap and place the cup where it's warm and sunny. When they've germinated, carefully remove them and plant each one in well-draining, acidic soil. We love activities that involve growing plants. Too much water in the jar or bag will allow mold to grow. If you harvest at the right time, your bean plants could continue to produce new pods for several weeks. Hopefully, doing those two things will stop the mold problem. For tips on how to know when to harvest your beans, keep reading! Support wikiHow by Can we put both of them together? Plant directly into the well-prepared soil when temperatures are right, or you can start seeds in pots. This image is not<\/b> licensed under the Creative Commons license applied to text content and some other images posted to the wikiHow website. Roots grow downwards to anchor the plant in the ground and find nutrients, and shoots grow upwards to find light. Your email address will not be published. Water twice a week. I am soaking my Lima beans to grow in our classroom and I noticed they are wrinkling and some of them are splitting. This image is not<\/b> licensed under the Creative Commons license applied to text content and some other images posted to the wikiHow website. Place the container near a window or on a window ledge. I tried this experiment with my class and we have a few moldy plants. 3 September 2021. 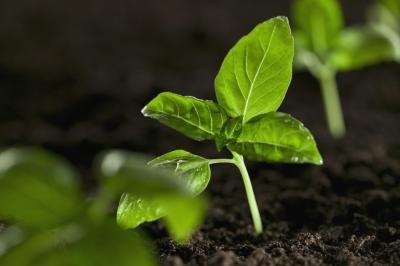 Thanks to all authors for creating a page that has been read 151,383 times. Youll also need to put up a trellis, which the bean plant will climb up as it grows. Once the plants have spouted, you can transfer them to the ground to keep growing.
 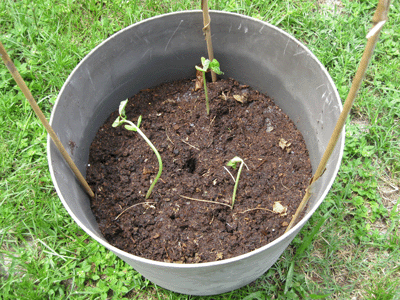 Last Updated: February 27, 2022 Thats a great question! Can I grow a bean plant from fresh beans, or do they have to be dry beans? Did you know you can get expert answers for this article? I havent tried pinto beans because Ive read they dont sprout as reliably as other beans. Place several beans on the outside of the paper towels in the container so you can watch them grow. They do this in symbiosis with bacteria. Check that the towels are still damp every day. Space bush beans 3 to 4 in (7.6 to 10.2 cm) apart with 2.5 to 3 ft (0.76 to 0.91 m) between rows. You dont need lids to begin the process. Put the cup/bag in a sunny spot and keep the paper towel damp. Light is not needed for germination, but Its really fun to watch the little beans grow so quickly. This image is not<\/b> licensed under the Creative Commons license applied to text content and some other images posted to the wikiHow website. Pick snap beans before the individual seeds inside the pods bulge. When you see signs of sprouting, remove the plastic wrap. Ooh great way to use my jars! Little ones will enjoy growing a bean for Jack and the Beanstalk. Light is not needed for germination, but You must let them expose to sun for a few minutes daily, but extensive exposure will cause the cotton to dry. This image may not be used by other entities without the express written consent of wikiHow, Inc.
\n<\/p>
\n<\/p><\/div>"}, {"smallUrl":"https:\/\/www.wikihow.com\/images\/thumb\/d\/d0\/Grow-a-Bean-Plant-Step-5-Version-3.jpg\/v4-460px-Grow-a-Bean-Plant-Step-5-Version-3.jpg","bigUrl":"\/images\/thumb\/d\/d0\/Grow-a-Bean-Plant-Step-5-Version-3.jpg\/aid2206209-v4-728px-Grow-a-Bean-Plant-Step-5-Version-3.jpg","smallWidth":460,"smallHeight":345,"bigWidth":728,"bigHeight":546,"licensing":"
\u00a9 2023 wikiHow, Inc. All rights reserved. 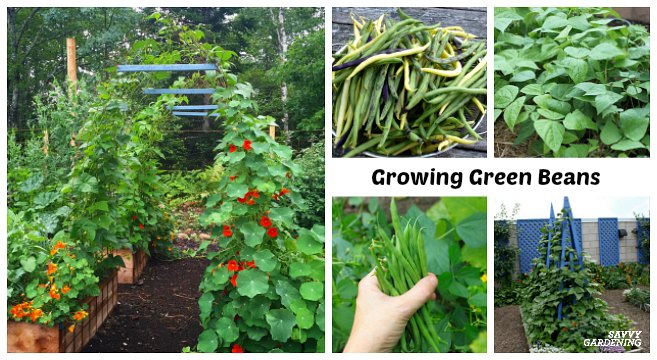
 If you soak the beans beforehand, they already have a good bit of water inside them so they dont need lots of water. My class will plant beans and peas. wikiHow, Inc. is the copyright holder of this image under U.S. and international copyright laws. Or can I salvage them? Is this normal? Fold your napkin or kitchen roll and place it in the jar ( we made the kitchen roll very slightly damp also ). Avoid direct sunlight for long periods. Place the container near a window or on a window ledge. If your plants have already developed true leaves, these should stay above the soil surface. Plant the seeds an inch (2.5 cm.) This image is not<\/b> licensed under the Creative Commons license applied to text content and some other images posted to the wikiHow website. 1. Some beans are runners and need to be staked or have something to climb, while others dont. If you use zip-top bags, open the bags after the beans sprout. 1. Space the seeds 3 inches (7.6 cm.) This image may not be used by other entities without the express written consent of wikiHow, Inc.
\n<\/p>
\n<\/p><\/div>"}, {"smallUrl":"https:\/\/www.wikihow.com\/images\/thumb\/8\/8c\/Grow-a-Bean-Plant-Step-2-Version-3.jpg\/v4-460px-Grow-a-Bean-Plant-Step-2-Version-3.jpg","bigUrl":"\/images\/thumb\/8\/8c\/Grow-a-Bean-Plant-Step-2-Version-3.jpg\/aid2206209-v4-728px-Grow-a-Bean-Plant-Step-2-Version-3.jpg","smallWidth":460,"smallHeight":345,"bigWidth":728,"bigHeight":546,"licensing":"
\u00a9 2023 wikiHow, Inc. All rights reserved. Gardeners with small spaces can learn how to grow beans in pots. apart or plant two to three seeds around each pole for vining varieties. wikiHow, Inc. is the copyright holder of this image under U.S. and international copyright laws. By signing up you are agreeing to receive emails according to our privacy policy. Use it to try out great new products and services nationwide without paying full pricewine, food delivery, clothing and more. Beans are a great plant for beginning gardeners to grow, as they are very easy to plant, maintain, and harvest. This material is based upon work supported by the National Science Foundation under Grant No. Pick snap beans before the individual seeds inside the pods bulge. We have to try this! Look for the plant with the longest root, the hairiest root, the greenest stem. wikiHow, Inc. is the copyright holder of this image under U.S. and international copyright laws. This image is not<\/b> licensed under the Creative Commons license applied to text content and some other images posted to the wikiHow website. Measure the bean plants once per week to track 2. Have children fold a paper towel to fit in a plastic sandwich bag. Last Updated on March 29, 2023 by Emma Vanstone. Sign up to get all the latest gardening tips! Plant & Gardening Specialist. Growing beans in containers is also useful for early starting where soil temperatures remain too cool for in-ground potting. Spray the paper towels with water to dampen them. References. Clear weeds and rocks from a row in your garden when the soil is dry enough to work in spring. WebSlide a few bean seeds between the paper towel and the sides of the cup/bag, where they can be clearly seen. Use them fresh for the best taste, or you can freeze or can them to enjoy far past the season. Clear weeds and rocks from a row in your garden when the soil is dry enough to work in spring. This activity is perfect for children who love to explore what is in store for them in the real world. It might be helpful to point out that you can germinate seeds, or help them start to grow, without soil. Hi Cara! They will plant some bean seeds in soil and some in a plastic bag without soil. Music Some people believe that music can help plants grow. A pot?  You provide an adequate temperature for the plant - some plants prefer cool but definitely not cold temperatures at around 65 degrees Fahrenheit. Beans are nitrogen fixing, meaning they can pull nitrogen from the air and add fertility to the soil. Science Sparks ( Wild Sparks Enterprises Ltd ) are not liable for the actions of activity of any person who uses the information in this resource or in any of the suggested further resources. Water twice a week. What do you think is going to happen in the cups? Additionally, how do I safely transfer them to plant so that students can take home? Water your seeds regularly. Cover the seeds gently with Show children how to moisten the soil, using the water spray bottle. Put the cup/bag in a sunny spot and keep the paper towel damp. Each student will use their pencil to make a hole in the middle of their soil about 1 inch deep, and place 2 beans in the hole. Spray some water on the bean every few days. If wikiHow has helped you, please consider a small contribution to support us in helping more readers like you. Guide them up the trellis in the direction you want them to go. wikiHow, Inc. is the copyright holder of this image under U.S. and international copyright laws. Pick shelling beans when the pods are thin and tough, but not dry. plastic cups (with hole poked in bottom for drainage), dry kidney or lima beans (NOTE: these must first be soaked overnight), large wall chart, Our Plants (chart described in Watch Them Grow learning center), Let each child fill a plastic cup most of the way with potting soil and plant 23 beans. Observe and watch the beans grow over the following days and weeks! Take photos of childrens planted beans in the cups and bags. Then, they can see if covering the jar affects growth. Ask. Plant seeds directly in the garden once the soil has warmed. They should fill in the hole to keep the seed covered. Move down the entire row in the same manner until you fill the last hole with the soil you removed from the beginning of the row. First, dig holes in the soil about 3 inches deep. The depth of the container size for growing beans varies dependent upon the type of vegetable. Popular snap beans include snap (green) beans, adzuki beans, mung beans, asparagus beans, and scarlet-runner beans. This article was co-authored by Olivia Choong. This image is not<\/b> licensed under the Creative Commons license applied to text content and some other images posted to the wikiHow website. Beans have the added value of being highly nutritious, giving you all the more reason to add them to your garden. deep and provide even moisture until the seeds germinate. If wikiHow has helped you, please consider a small contribution to support us in helping more readers like you. You can use whatever support system (trellis, pole, fence, arbor, etc.) Other than that, just plant it in soil and watch it grow! Transferring the Plants to Soil 1. Some students may wonder how these seeds will grow without soil. WebNow that some of the bean plants growing in the cups are above the soil, what do you think it looks like below the soil?Why? "This information was so helpful. Sometimes theres a huge difference from day to day. Observe and watch the beans grow over the following days and weeks! Tie pole beans to their trellis with garden twine as soon as they are tall enough to reach the trellis. wikiHow, Inc. is the copyright holder of this image under U.S. and international copyright laws. Thank you for sharing at Sharing Saturday! Once your seed has germinated and grown a little bit, youll need to transfer it into a pot of soil. Hunker may earn compensation through affiliate links in this story. I live in the Midwest and germinated these seeds towards the end of January!